For the first part of the year 2011, I would like to thank each and everyone of my friends and regular readers who drop by here every now and then to check out what’s new at prodigalconcepts.com and I wish you all good things this year and please continue to support my site and help me spread the word by sharing the articles you find interesting with your friends!
Today we will be creating a very cool “Pin Wheel” in Photoshop with the help of the Pen Tool. And to make it easy for us we will borrow this image of a pinwheel from the NewarkLibrary blog or download it here!
Final Image

Difficulty: Beginner – Intermediate
Duration: 45 mins (plus or minus)
Basics
Open your pinwheel image in Photoshop. Then create a new layer above it and rename it “Outline” now grab your Pen tool from your tools pallete or just hit (P) on your keyboard.
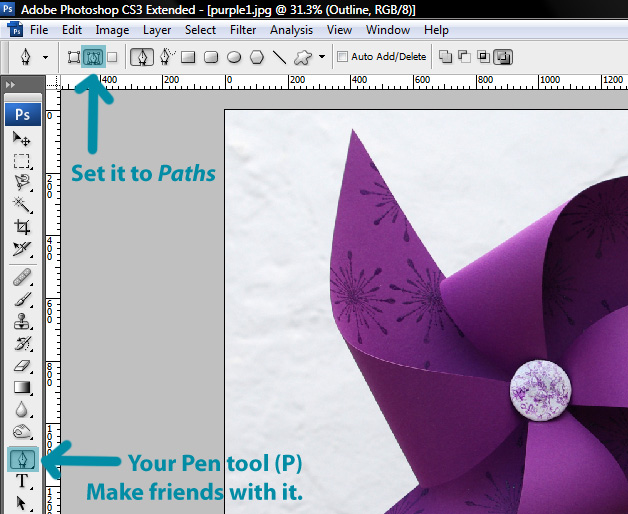
Try to zoom in (Ctrl +) to see the edge of the “Pin Wheel” clearly, now start tracing the outline of the “Blade” or the “Leaf” (I have no idea what it’s called). Start wherever it’s comfortable for you, I’m going to start from the top left going down. Just click on a point in the outer part of the Pin Wheel “Blade” (I decided to call it Blade for duration of this tutorial) and trace the edges point to point (if it’s a straight line).
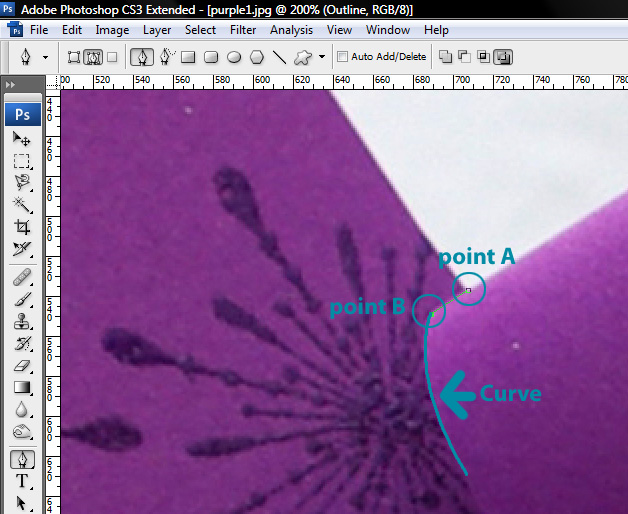
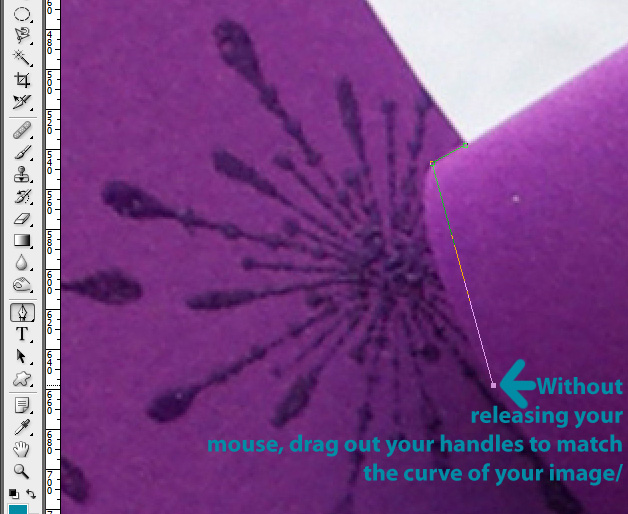
If it’s a curve,try to get a wide area from your outline and without releasing your mouse drag its handles out to match your images curve.
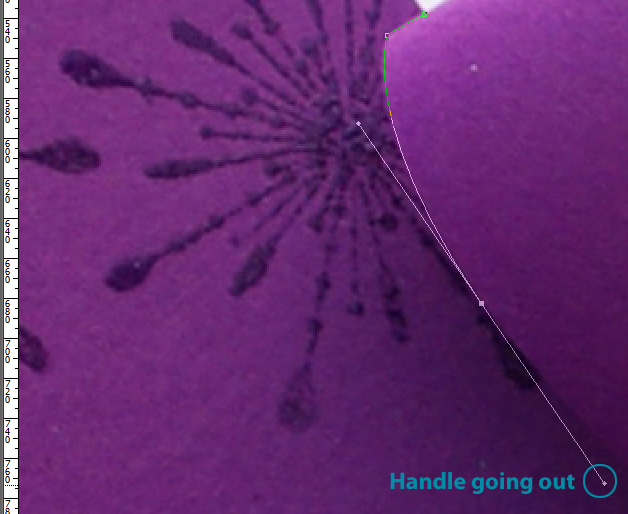
To continue working on your path, hold Alt key and Click on your original point to cut a corner, (while holding Alt key hover your mouse to the last point you created it should show ^ symbol, click on the point.) Your drag handle will disappear so you can now continue tracing your outline.
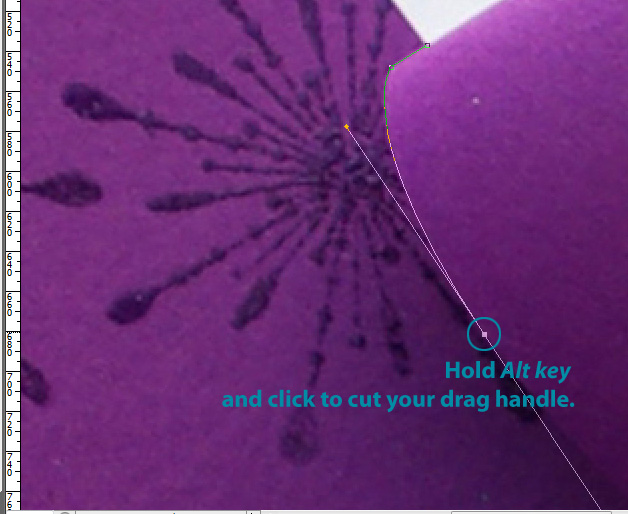
Once you have outlined the entire “Blade” you can close your path by joining your last point with your original anchor point, you should see a small circle, like a degree symbol ° this means your are about to close your path.
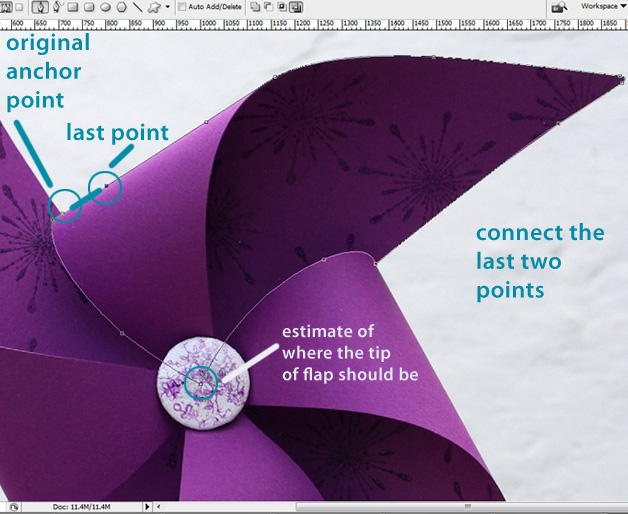
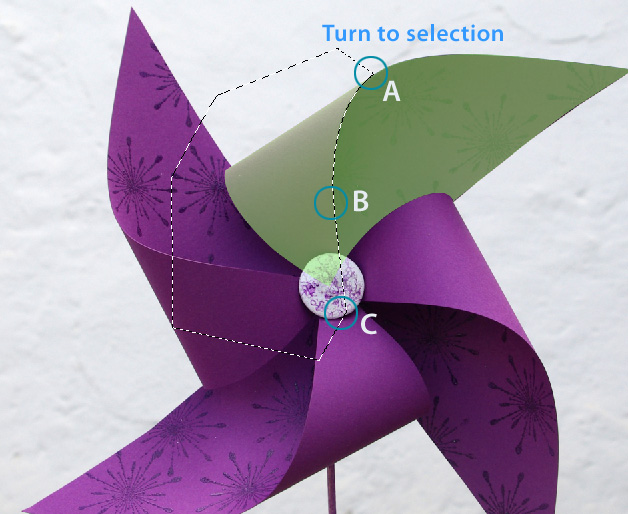
If you are satisfied with the outline of your shape, turn your path into a selection (Ctrl + Enter). Turn off your Pin Wheel “Background” layer image by poking the eye next to it and you should have something like this.
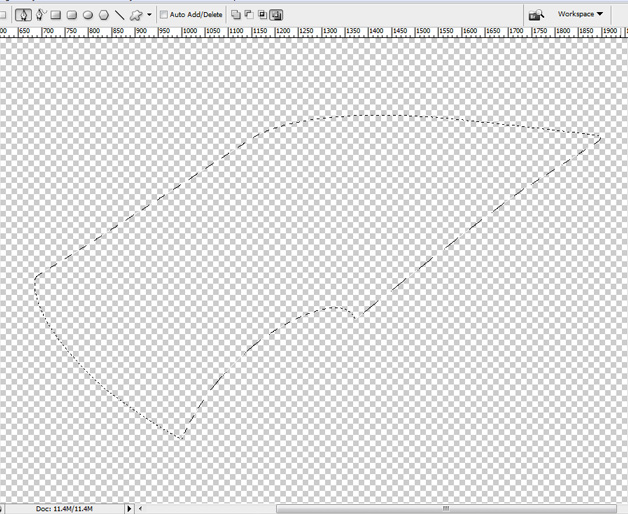
Then make sure you have your “Outline” layer selected, fill this selection with a nice Pastel Green like #9ffc71.
Next we will trace the outline of the part of the blade I’m calling Flap (for lack of any other word for it). I see 2 ways we can do this, the Hard way is to retrace the part of the flap using the Pen Tool the same way we did the “Outline” which is a good exercise. Then there is the easy way which will cut corners and save us some time, since I’ve already shown you how to trace the entire outline I’m cutting corners for the “Flap” and take the easy way.
First duplicate your “Outline” layer and rename it “Flap” bring down its Opacity to around 50%, then turn off your “Outline” layer and then turn on the Pin Wheel “Background” layer.
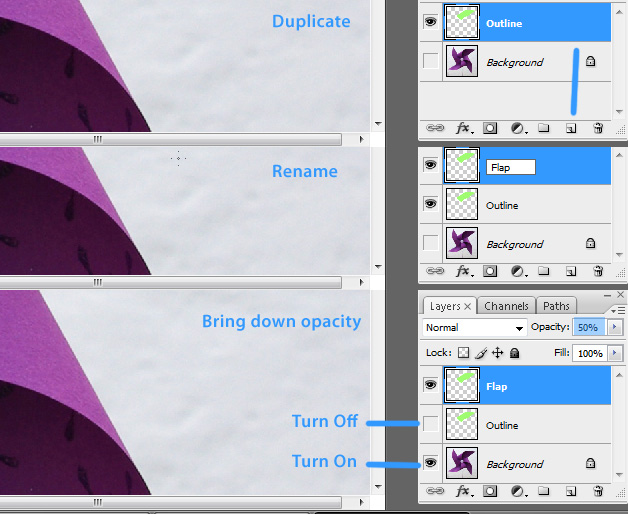
Get your Pen Tool out, and use the Pin Wheel “Background” layer image for reference, trace the inside curve of the Flap. We are only after the curve, so here it’s OK to go outside the “Flap” layer and once you have cleared the image just circle around the rest of your image to close off your path.
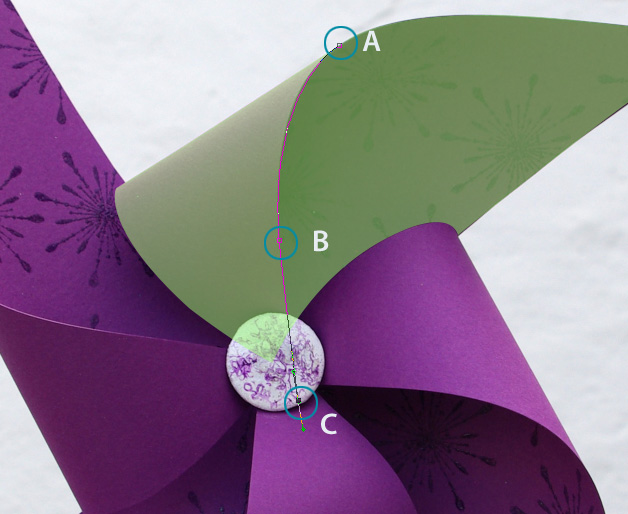
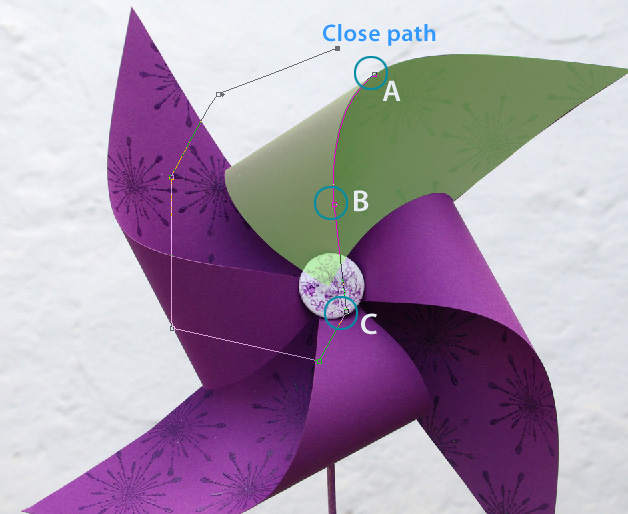
Then turn it into a selection, we only need the part of the image inside our selection and discard the rest. So you can do two things add a layer mask to hide the unselected part or use Select > Inverse (Ctrl +Shift + I) and delete the part we wont need.
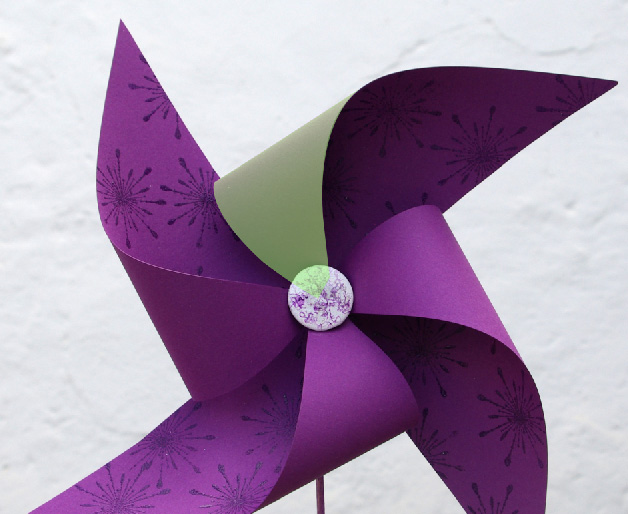
Now we can bring the Opacity back to 100% for our “Flap” image layer. And begin adding details. Use a nice light color to make a background of our work area so we can better see what were doing while adding details. Mine will be #fefdfd for the Foreground and #cefbb8 for the Background then apply it with a Radial gradient effect starting from the middle going out. Something like this.

Colors and shades
So we are ready, first lets give our “Outline” layer a bit of light and shade. To do this, create a new layer on top of the “Outline” layer and rename it “Outline-light” make a selection with your “Outline” layer by (Ctrl + click) your image from the Layers panel you will see the running ants will start marching.
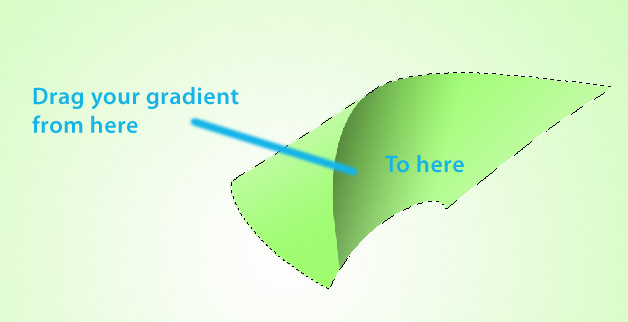
Make your Foreground color a light shade of green like #d7fbc6, then set your Gradient tool to Linear gradient and your gradient picker is set to Linear to Transparent. Start outside the selection from the lower right of the image in a diagonal motion going in. This will give your image a nice 2 tone green.

We need to add some shadows, create a new layer on top of the “Light” layer and rename it “Shadow”. Then make a selection with your “Outline” layer again by (Ctrl + click) your image from the Layers panel one more time. This time set your Foreground color to Black #000000, and with the same Gradient tool settings as the light (except for the color) apply the gradient starting from the opposite direction, upper left diagonal motion going down. Then bring down your “Shadow” layers opacity to around 75%.
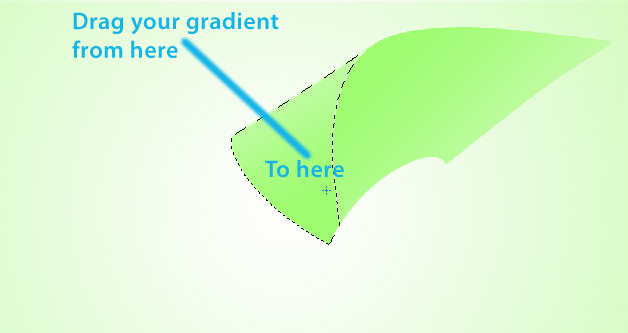
Time to give the “Flap” layer a light effect too by repeating the steps we made for the “Outline-light”, create a new layer on top of the “Flap” layer and name it “Flap-light” add the same gradient effect but from the opposite direction by starting from the upper left going down in a diagonal slice.
One piece of the puzzle is complete, time to group all your layers except for the “Background” layer that we made, you can also discard the original Pin Wheel image, it has served its purpose. Select all the layers thats part of the “Blade” by selecting the top most layer then while holding the Shift key click on the last bottom layer. Now that all your layers are high-lighted drag them down to the Folder looking button below your layers panel. This will group all the “Blade” layers into one folder, rename this group “Blade-green”.
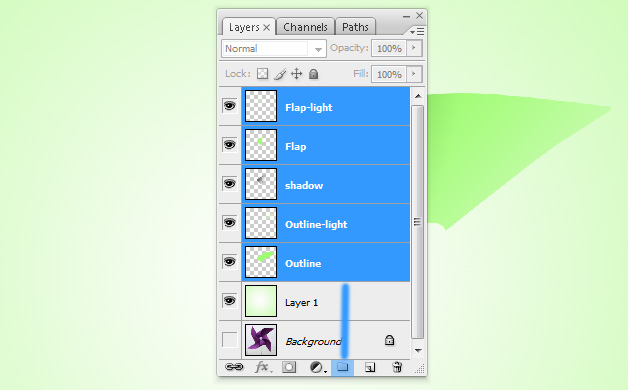
Grouping
Take the group folder “Blade-green” and duplicate it, rename the copy “Blade-blue”, while this group is still selected go to Edit > Transform > Rotate 90° CW. Move this group and use your judgement to position it as the second blade. We will need to change this groups color scheme. Expand the “Blade-blue” folder and locate the layer “Outline copy” while this layer is selected go to Blending options and apply a color overlay use #71fcbf, then copy this layer style to your “Flap copy” layer. Do the same Blending option adjustment for the “Outline-light copy” layer but you should give it a lighter shade of blue like #bcf7fb, then copy this layer style to the “Flap-light copy” image layer.

Here’s a neat trick, read carefully moving forward because this might start to get confusing as we go back and forth the two folder groups. As you can see the two “Blades” are missing a shadow where they are joined together so do this, first create a new layer above the “Shadow” layer of the group “Blade-green” and rename this “Shadow2” then make a selection using the “Outline copy” layer from the group “Blade-blue” fill this with Black #000000 apply a Gaussian blur with 50px Radius bring down the Opacity to 50% while “Shadow2” layer is still selected turn the layer “Outline” from the group “Blade-green” into a selection and then invert the selection hit Del you should now have a nice shadow between the 2 “Blades”.

Now repeat this steps a few more times starting from (Grouping) until you have 4 multi colored “Blades” like this.

We will now add a Pin to our image to complete our Pin-Wheel project, create a new layer on top of all the grouped layers and name it “Pin”. Take the Ellipse tool from the Shapes pallette and make a nice little circle and turn it into a selection. Make your Foreground color #cbfab9, and your Background color #3399ff, set your Gradient tool to Radial and the gradient picker to Foreground to Background, apply the gradient starting from the center going out. Next lets give it a shadow effect, (Ctrl + click) your “Pin” image and create a new layer below it, rename this “Shadow” fill it with Black #000000, then go to your Filter > Blur > Gaussian Blur and make the Radius: 10px then change the opacity to 75%.

Last but not the least is the nice looking handle. Create a new layer below all the grouped layers and rename it “Handle”. Get your Rectangular marquee tool and create a long vertical rectangle. Fill this with #3399ff, create a new layer and name it “hilite” (Ctrl + click) your “Handle” to make a selection, then fill it with White #ffffff, reduce it’s width to around 50% or less. Give it a Gaussian blur with a Radius of 5px, keep it a little to the left.

Time to admire your work

I hope you all like this and put it to good use, share it with your friends and if you happen to use it in one of your projects give me a shout out and I will include it here. Thank you all very much. PEACE!

Comments
4 responses to “How to create a cool pinwheel in Photoshop”