Today I will embark on a momentous journey and you’re more than welcome to tag along. A few days ago I have released a photo manipulation I called “The Ninth Planet”. I made this for myself a personal project to give my screen a new dimension (all puns intended LOL). As I’m working on a laptop with a maximum resolution of 1280×800 the full dimension of my work was the same.
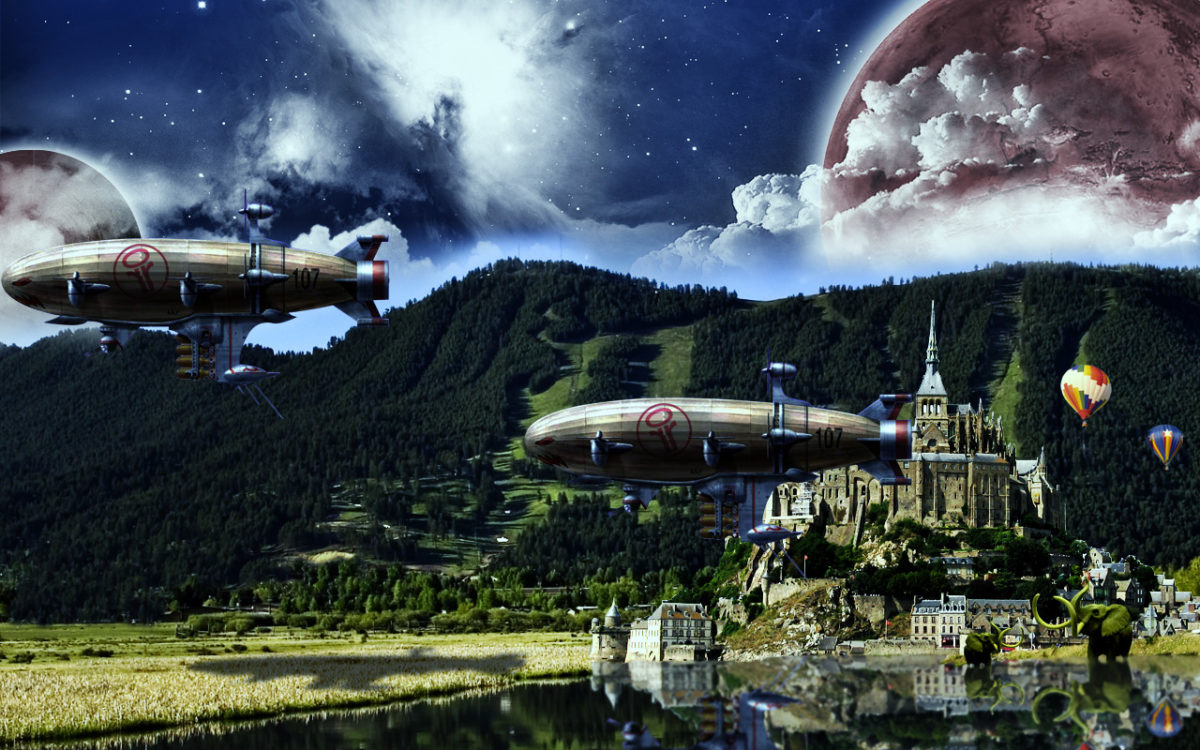
The Ninth Planet

We will be recreating it here step by step, but with a bit of a twist, using my trusted laptop and all its 1280×800 resolution we will make a 2560×1600 version (everyone goes whoa!). So if you guys are ready for this trip start your engines and let’s get crack’n.
I’ve decided that I will post this tutorial in parts so we could focus on the task details before moving on to the different stages needed to complete the scene. So for today we will start with the background particularly the landscape.
What we will be making

What we need for this project:
Stock photo of a landscape from pixmac.com
Open Photoshop and create a new file with 2560×1600 dimensions and rename it “ninth planet”. Now open your landscape stock image and copy it to our “ninth planet” file.

The landscape
As you can see, our Landscape stock image in all it’s 1920×1200 is too small for our work area. Stretching the image is not an option here because it will not look good.

What we will do is position our landscape on the right bottom part of our work area by selecting all Ctrl + A then with your Move tool (V) selected go to your Alignment options and choose Align bottom edges and Align right edges. (Note: Icons highlighted in blue)

To make the landscape fill the empty space duplicate your Landscape layer. Then with your Landscape layer copy selected go to Edit > Transform > Flip Horizontal. Now move it to the left with the left arrow key or Shift + left arrow key until the edge of your Copy layer touches the end of your original Landscape layer. Merge the two layers and rename it “Landscape”.

Now we have a full width landscape. Weird looking yeah, but we can take care of that easy. Grab your Lasso tool (L) then set your Feather radius to around 35px, anti alias ticked and round up a small part of river bank where your two landscape images were joined.

Copy this selection, Ctrl + C, and paste it on a new layer Ctrl + V then move it to the left. Just use your judgment to align it to the direction of the river bank of your right side image (arrow keys Up, Down, Left, Right), better Zoom in to clearly see your work.
Duplicate it Ctrl + J (3 to 4) times or as many times as you need to make it reach the edge of the work canvas something like this.

The next problem we have is that patch of water remaining from our original Landscape image. It’s time to merge our layers so we don’t have to go back and forth from layer to layer. Then make sure you have a soft round brush selected. This time we need to call upon the services of our Clone stamp tool (S). Pick a nice spot of dry grass the thicker the better. That area where we joined our two landscapes looks promising. Zoom in close to that area then just click anywhere while you hold down the Alt key and release. You can start brushing away the patch of water. Feel free to increase or decrease your brush size to optimize the effect.

Now that’s done check out this screenshot…

We need to fix the areas circled in blue, we don’t really need those houses, and the mountain where we merged the two landscapes look unnatural. So with the same technique we used to fix the patch of water previously we will repeat here using the trees to reforest these areas.
And that’s it, time to admire your work, we will leave the top half as it is for now, save your work and next time we will continue working on our projects Stratosphere with “Skyscape”.
Comments
2 responses to “A photo manipulation tutorial, landscape – The Ninth Planet part 1 of 3”