One of the regular avenues where I get my sites traffic from is Yahoo Answers! I often stop by here when things start to slow down during the day, it helps me keep myself on my toes and stretch some brain muscles while helping others with their problems related to computers and the internet which is one of the categories I frequent in this Yahoo community.
Aside from hardware issues, or computer virus issues, basic programming syntax or debugging problems the question of “How do I set up a (free) website?” pops up on a regular basis. They are posted by students who are doing some project for their school or from start up business owners who would like to venture online.
This is a play by play of how to do this for anyone interested with little or no experience with setting up a website. But before we proceed I would like everyone to know that this tutorial will not touch on the subject of how to create a website from scratch.
If you want to get started with HTML first,
Related readings that could help:
- The Essentials of Creating a Website
- How to Build a Web Site from Scratch with No Experience
- How to Make a Website
- How to Create a Simple Web Page With HTML
Setting up a website for free
When setting up a website for free there are limitations of course or no one would be in the business of providing web and domain hosting which is like a virtual real estate, so before we begin we must answer the question.
What’s the purpose of your website?
Since were talking about free websites with no cash out whatsoever, what do you need it for?
1. School project
2. Personal project
3. A small business (selling your stuff, stuff you created from your spare time, etc.)
4. You want a website for your dog, your cat, or your goldfish.
5. Or you just want to practice and see how the big boys do it.
I did mention small businesses and if you’re just starting out, a free site could do the trick but don’t forget that there will be limitations. But still this will get you by until you can afford to put up a real site. OK, Once you have all the resources and write ups let’s start with the easiest.
A blogsite
Blogsites are free and most if not all of them are free hosted as well, so you generally have 2 for 2 here, a free web site and a host. They come with easy to follow set up instructions and you get to choose from a lot of different themes to skin your website. After you set it up your good to go, it supports image uploads and video uploads too. If you generate enough following you can even use it to earn some money having ads placed on your blog.
I’m giving you two options because we don’t need to complicate it, www.blogger.com (a.k.a. blogspot) and wordpress.com not to be confused with wordpress.org which is a stand alone blog platform it’s also open source which means it’s free, more powerful and customizable than the other two I mentioned simple and easy to use but it requires a web server (host). It also provides a range of useful extensions/plugins which makes customizing more easier. But some intermediate back-end coding is required.
blogger.com a.k.a. blogspot
Rate of Difficulty: Easy to Moderate
This blogger service was acquired by Google in 2003 (from Pyra Labs – the company that coined the word Blog, creating the service Blogger) so chances are if you have a Gmail account then your one step closer to your Blogger account because Google allows you to use your Gmail for other products that they have (like adsense, analytics, etc.) You can always sign up for a new one because it’s uber easy to do and it’s free.
So for blogger.com
Go to the website
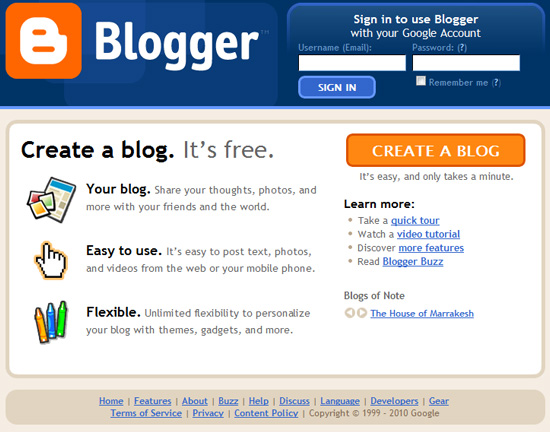
blogger.com, click on the big orange button that says create a blog.
Step 1
Fill out all the necessary details.
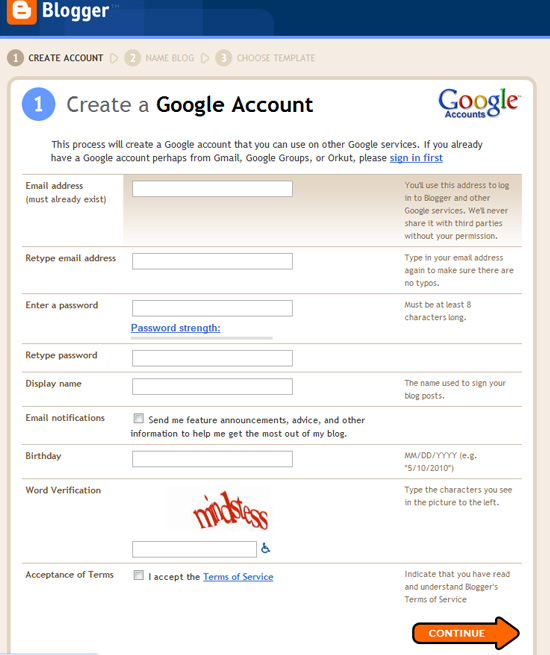
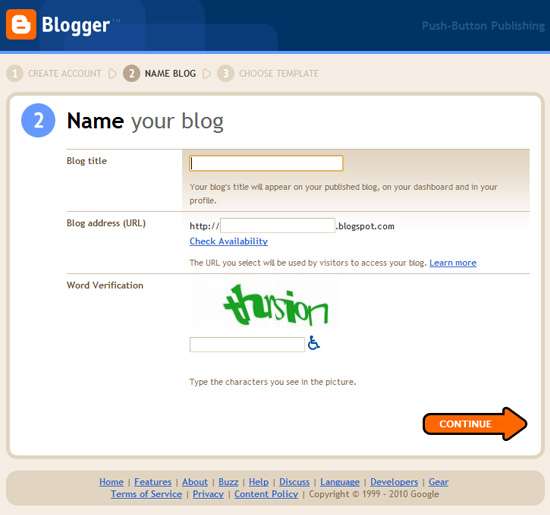
Step 2
The fun part, naming your first website, don’t worry if you haven’t thought this one through you can rename this anytime you want, but don’t wait too long because if you are able to get subscribers early renaming your site will confuse them and you may lose the traffic.
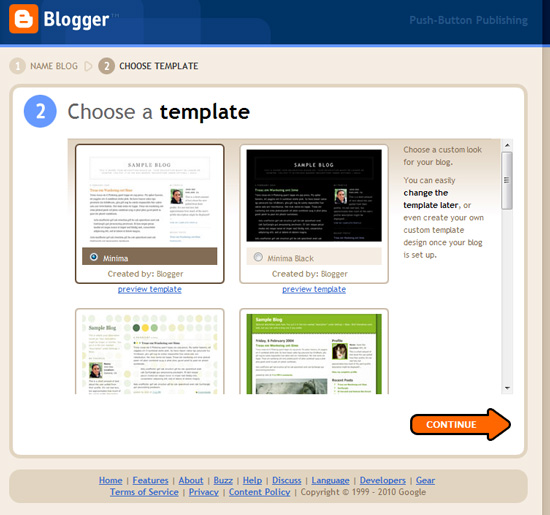
Step 3
Choosing a template, learn what template matches your blogsite you can experiment with this until you find the right one.
Step 4
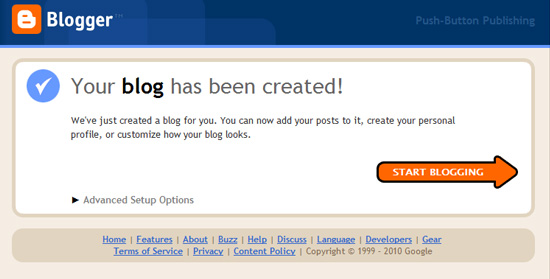
You’re done you can begin populating your brand new website, write something about your pet’s habits, your favorite food or watering hole, where to get stuff for free, sell your art, do whatever you want with it. Just like any new toy start having fun and play with it, learn to navigate around your new blogger account.
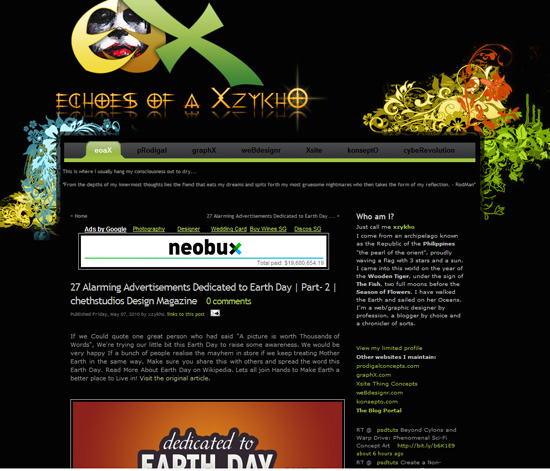
Echoes of a Xzykho
My first blogsite which happens to be a blogger account has been up since 2006 I try to write there every now and then, I’ve learned a lot from it and it’s a good training ground for writing about almost anything, and if you’re keen on HTML and CSS then you can also try practicing around your themes layout. (Note: Make sure you back up the original template codes before you start hacking away.)
I will not go into details with activating a wordpress.com blog not because I don’t recommend it but only because the procedure is almost the same and I’m sure you guys are smart enough to figure this one out by yourself. What I’m going to show you is something more powerful than a regular free blog. I’m going to show you how to set up your static website or a wordpress.org template on a freehost.
This is only for those who have a website ready and would like to put it up on the web, and also for those who would like to give wordpress a try.
Using your own website files or a wordpress platform
Rate of Difficulty: Moderate to Heavy
Step 1
First thing you need to do is register for a free host at kwikphp.com or 000webhost.com don’t worry I am not affiliated with either of this 2 host sites. I’m not asking you to get your site hosted here too, I however have tried kwikphp.com to put up my test online portfolios so I’m just extending to all of you that they are cool and a good friend of mine recommended 000webhost.com and says it’s way much better. But before you sign up make sure to make your own comparison and pick the one that suits you best.
Step 2
Once registered you will need a free FTP client (File Transfer Protocol) this will allow you to have a direct line of communication from the client (your local machine) to the server (your host). I recommend you download Filezilla another open source software solution or a plugin for your Mozilla Firefox browser called Fire FTP this one is like an add on to your browser while Filezilla is an application you need to install locally.
Optional
Last thing you will need is optional just in case you want to try wordpress then I suggest you download the latest version.
When you get everything up and running it’s time to configure your FTP client to connect to your web host.
Details you will need from the host:
- Host name – or FTP Server
- User Name
- Password
Your hosting company should send you these details via email but if you did not receive one you can log-in to your account and look for the FTP management tab or page. Open your FTP client if you are on Filezilla enter the required details then choose “Quickconnect”, if you’re using Fire FTP click on the “create account” drop down menu and enter your account details.
Once connected you will be looking at two boxes that looks like your folder directory one would be your local machine and the other will be the server directory. Look for the directory folder named “htdocs” or “public_html” different servers have different root directory names but it’s usually these two, if you can’t find it then look it up on the help section or ask an admin.
Open the public directory, then on your local machine side locate the folder of your website, make sure you have an index page then just drag your files from your local folder to your server folder and wait, another method would be to high-lite the files you want to upload then right click to see your options you will see an option to upload just click on it and wait. When its all done type in your domain name on your favorite browser and enjoy. Since its free you don’t have the luxury to have your own personal domain name usually it’s a subdomain using your username then the servers domain name i.e. xzykho.kwikphp.com
For a wordpress blog it’s almost basically the same process except with a wordpress blog platform you will need to configure your wp-config-sample.php by opening it in a text editor, dreamweaver would be perfect, but a notepad can also work.
Look for the following. (Usually found at the beginning)
// ** MySQL settings – You can get this info from your web host ** //
/** The name of the database for WordPress */
define(‘DB_NAME’, ‘putyourdbnamehere’);
/** MySQL database username */
define(‘DB_USER’, ‘usernamehere’);
/** MySQL database password */
define(‘DB_PASSWORD’, ‘yourpasswordhere’);
/** MySQL hostname */
define(‘DB_HOST’, ‘localhost’); – this part is optional sometimes you just leave it alone but if it doesn’t work look for it in your C-panel.
replace all requirements with your account details then save the file as wp-config.php (without -sample). Then you are ready to upload it to your host. Once everything is in run the wordpress installation script by accesing wp-admin/install.php in your browser of choice. This means if you put your files in the root directory you should have http://www.xzykho.kwikphp.com/wp-admin/install.php and it’s all fool proof from there. If you run into some issues be sure to check out Famous 5-Minute Install from wordpress.org
More comprehensive reading
Well that’s all there is to it…
Compare a Free site vs. a Paid site
Here you will get an idea from some people about the difference of having a free website against a paid web site.
- Make Your Own Website – Free Vs Paid Website Editors For Professional Use
- Free vs. Paid Website Hosting
- Want to Create a Free Website?
If you have any questions about this post feel free to post your inquiries and comments and I will try to get back to you as soon as I can. And if you find this tutorial helpful or interesting help me spread the word by clicking on the social bookmarking button “Sharing is Sexy!” and share it with you friends on the social bookmark networks provided.

Comments
12 responses to “How to set-up a free website on a free web-host for newbies”